Python GUI Cookbook —— 定制 widgets

通过改变 widget 属性来定制 GUI

创建消息框——信息、警告和错误

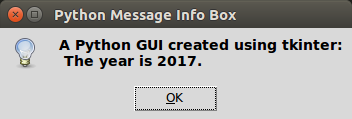
消息框是一种用于给用户反馈的弹出式窗口,它可能是提示性的,也可能是显示潜在问题的,还有可能是指出灾难性错误的。

首先导入模块

1
2
3
4
5
6
7
8
#!/usr/bin/env python3

import tkinter as tk
from tkinter import ttk
from tkinter import scrolledtext
from tkinter import Menu
from tkinter import messagebox as msg
[...]

创建消息框的回调函数,此时我们点击 Help|About

1
2
3
4
5
6
7
8
9
10
11
12
13
14
15
16
[...]
# Display a message box
def _msgBox():
msg.showinfo('Python Message Info Box',
'A Python GUI created using tkinter:\n The year is 2017.')

# Add another Menu to the Menu Bar and an item
help_menu = Menu(menu_bar, tearoff=0)
help_menu.add_command(label='About', command=_msgBox)
menu_bar.add_cascade(label='Help', menu=help_menu)


name_entered.focus()

window.mainloop()

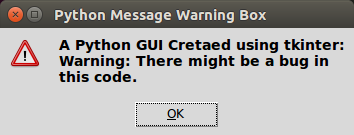
将消息换成警告

1
2
3
4
5
6
7
8
9
[...]
# Display a message box
def _msgBox():
# msg.showinfo('Python Message Info Box',
# 'A Python GUI created using tkinter:\n The year is 2017.')
msg.showwarning('Python Message Warning Box',
'A Python GUI Cretaed using tkinter:'
'\nWarning: There might be a bug in this code.')
[...]

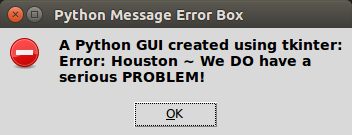
显示一个错误信息

1
2
3
4
5
6
7
8
9
10
[...]
# msg.showinfo('Python Message Info Box',
# 'A Python GUI created using tkinter:\n The year is 2017.')
# msg.showwarning('Python Message Warning Box',
# 'A Python GUI Cretaed using tkinter:'
# '\nWarning: There might be a bug in this code.')
msg.showerror('Python Message Error Box',
'A Python GUI created using tkinter:'
'\nError: Houston ~ We DO have a serious PROBLEM!')
[...]

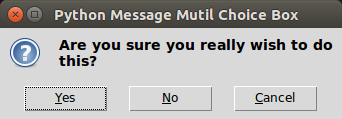
创建多选框

1
2
3
4
5
6
7
8
9
10
11
12
13
14
15
[...]
# Display a message box
def _msgBox():
# msg.showinfo('Python Message Info Box',
# 'A Python GUI created using tkinter:\n The year is 2017.')
# msg.showwarning('Python Message Warning Box',
# 'A Python GUI Cretaed using tkinter:'
# '\nWarning: There might be a bug in this code.')
# msg.showerror('Python Message Error Box',
# 'A Python GUI created using tkinter:'
# '\nError: Houston ~ We DO have a serious PROBLEM!')
answer = msg.askyesnocancel('Python Message Mutil Choice Box',
'Are you sure you really wish to do this?')
print(answer)
[...]

然后我们就可以用

1
2
If answer == True:
<do something>

来实现一些功能了

创建独立的消息框

这里我们将做一个顶层窗口的消息框

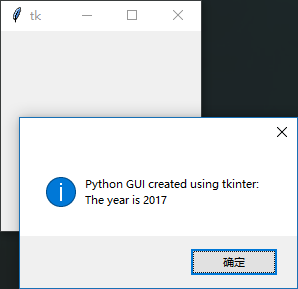
先创建一个简单的窗口看看效果:

1
2
from tkinter import messagebox as msg
msg.showinfo('', 'Python GUI created using tkinter:\nThe year is 2017')

这会产生下面这两个窗口

可以看到这并不是我们想要的

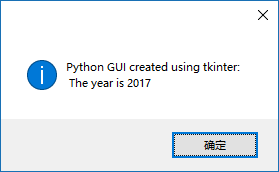
通过下面代码去掉额外的窗口

1
2
3
4
5
6
7
from tkinter import messagebox as msg
from tkinter import Tk

root = Tk()
root.withdraw()
msg.showinfo('', 'Python GUI created using tkinter:\n The year is 2017')

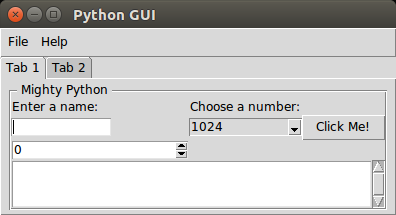
创建 tkinter 窗体的标题

1
2
3
4
import tkinter as tk

window = tk.Tk()
window.title('Python GUI')

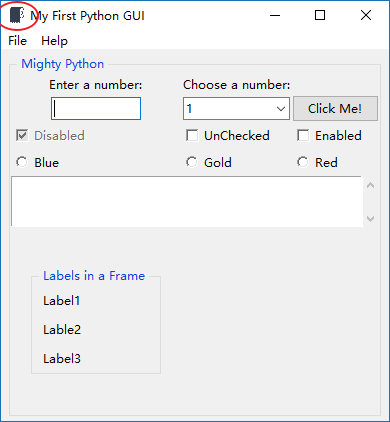
更换根窗口的图标

1
2
3
4
5
6
7
[...]

window.iconbitmap('卷纸.ico')

name_entered.focus() # Place cursor into name Entry
# Start GUI
window.mainloop()

使用 spin box

1
2
3
4
5
6
7
8
9
10
11
12
13
14
[...]
from tkinter import Spinbox
[...]
# Adding a Spinbox widget
spin = Spinbox(mighty, from_=0, to=10)
spin.grid(column=0, row=2)

# Using a scrolled text control
scrol_w = 30
scrol_h = 3

scr = scrolledtext.ScrolledText(mighty, width=scrol_w, height=scrol_h, wrap=tk.WORD)
scr.grid(column=0, row=3, sticky='WE', columnspan=3)
[...]

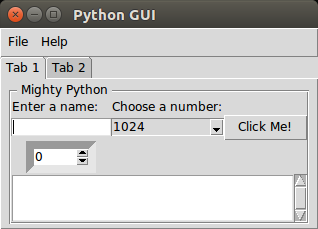
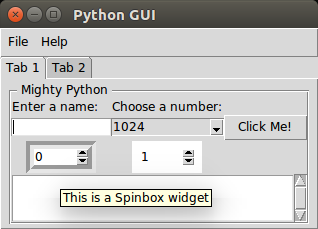
接下来对该 widget 定制一番:减小宽度,增加边框(borderwidth,bd)

1
spin = Spinbox(mighty, from_=0, to=10, width=5, bd=8)

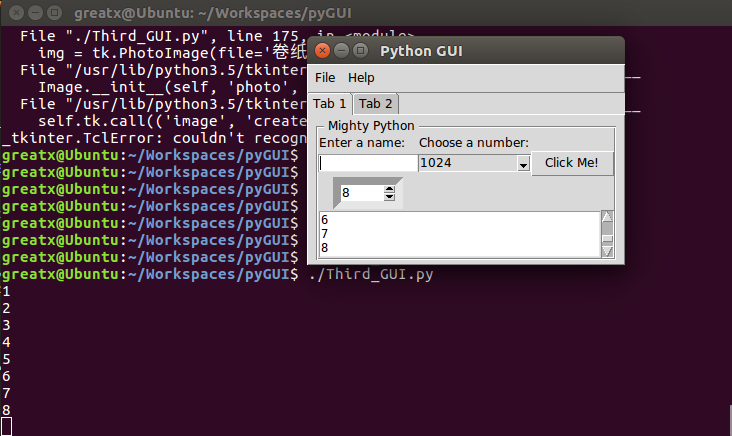
给 widget 增加实际功能

1
2
3
4
5
6
7
8
9
10
[...]
# Spinbox callback
def _spin():
value = spin.get()
print(value)
scr.insert(tk.INSERT, value+'\n')

# Adding a Spinbox widget
spin = Spinbox(mighty, from_=0, to=10, width=5, bd=8, command=_spin)
[...]

还可以使用

1
spin = Spinbox(mighty, values=(1, 2, 4, 42, 100), width=5, bd=8, command=_spin)

widget 风格

给 spinbox 增加 bd

1
2
3
4
5
6
7
8
[...]
# Adding a Spinbox widget
spin = Spinbox(mighty, from_=0, to=10, width=5, bd=8, command=_spin)
spin.grid(column=0, row=2)

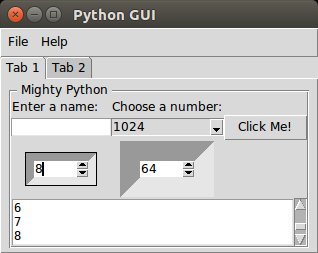
Spinbox(mighty, values=(1, 2, 4, 8, 16, 32, 64),
width=5, bd=20).grid(column=1, row=2)
[...]

  • 两个 spinbox 都是浮雕(relief)风,第二个具有更大的边框
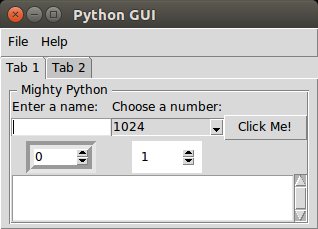
  • 默认的 relief 属性是 tk.SUNKEN

relief 属性的可选值

|tk.SUNKEN|tk.RAISED|tk.FLAT|tk.GROOVE|tk.EIDGE|

1
2
3
4
5
6
7
8
9
[...]
# Adding a Spinbox widget
spin = Spinbox(mighty, from_=0, to=10, width=5, bd=8, command=_spin,
relief=tk.GROOVE)
spin.grid(column=0, row=2)

Spinbox(mighty, values=(1, 2, 4, 8, 16, 32, 64),
width=5, bd=8, relief='flat').grid(column=1, row=2)
[...]

使用提示(tooltips)

添加一个 tooltip 应该是一件简单的事,但这里它并不像我们想象的那么简单

首先需要添加一些面向对象(OOP)代码

1
2
3
4
5
6
7
8
9
10
11
12
13
14
15
16
17
18
19
20
21
22
23
24
25
26
27
28
29
30
31
32
33
34
35
36
37
38
39
40
41
42
43
44
45
46
47
48
49
50
51
import tkinter as tk
from tkinter import ttk
from tkinter import scrolledtext
from tkinter import Menu
from tkinter import messagebox as msg
from tkinter import Spinbox


class ToolTip(object):
def __init__(self, widget):
self.widget = widget
self.tip_window = None


def show_tip(self, tip_text):
if self.tip_window or not tip_text:
return
# get size of widget
x, y, _cx, cy = self.widget.bbox('insert')
# calculate to display tooltip
x = x + self.widget.winfo_rootx() + 25
y = y + cy + self.widget.winfo_rooty() + 25
# create new tooltip window
self.tip_window = tw = tk.Toplevel(self.widget)
# remove all Window Manager (wm) decorations
tw.wm_overrideredirect(True)
tw.wm_geometry('+%d+%d' % (x, y))

label = tk.Label(tw, text=tip_text, justify=tk.LEFT,
background='#ffffe0', relief=tk.SOLID, bd=1)
label.pack(ipadx=1)


def hide_tip(self):
tw = self.tip_window
self.tip_window = None
if tw:
tw.destroy()


def create_ToolTip(widget, text):
tooltip = ToolTip(widget)
def enter(event):
tooltip.show_tip(text)
def leave(event):
tooltip.hide_tip()

widget.bind('<Enter>', enter)
widget.bind('<Leave>', leave)

[...]

给一些 widget 添加 tooltips

1
2
3
4
5
6
7
8
9
10
11
12
13
14
15
16
17
18
19
20
21
[...]
# Adding a Spinbox widget
spin = Spinbox(mighty, from_=0, to=10, width=5, bd=8, command=_spin,
relief=tk.GROOVE)
spin.grid(column=0, row=2)

create_ToolTip(spin, 'This is a Spinbox widget')

Spinbox(mighty, values=(1, 2, 4, 8, 16, 32, 64),
width=5, bd=8, relief='flat').grid(column=1, row=2)

# Using a scrolled text control
scrol_w = 30
scrol_h = 3

scr = scrolledtext.ScrolledText(mighty, width=scrol_w, height=scrol_h, wrap=tk.WORD)
scr.grid(column=0, row=3, sticky='WE', columnspan=3)

# Add a Tooltip to the ScrolledText widget
create_ToolTip(scr, 'This is a ScrolledText widget')
[...]

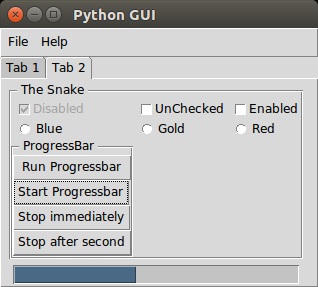
添加进度条

1
2
3
4
5
6
7
8
9
10
11
12
13
14
15
16
17
18
19
20
21
22
23
24
25
26
27
28
29
30
31
32
33
34
35
36
37
38
39
40
41
42
43
44
45
[...]
from time import sleep
[...]

# update progressbar in callback loop
def run_progressbar():
progress_bar['maximum'] = 100
for i in range(101):
sleep(0.05)
# increment progressbar
progress_bar['value'] = i
# have to call update() in loop
progress_bar.update()
# reset/clear progressbar
progress_bar['value'] = 0

def start_progressbar():
progress_bar.start()

def stop_progressbar():
progress_bar.stop()

def stop_after_second():
window.after(500, progress_bar.stop)

# Create a container to hold labels
buttons_frame = ttk.LabelFrame(mighty2, text=' ProgressBar ')
buttons_frame.grid(column=0, row=3)

# Place labels into the container element
ttk.Button(buttons_frame, text=' Run Progressbar ',
command=run_progressbar).grid(column=0, row=0, sticky=tk.W)
ttk.Button(buttons_frame, text='Start Progressbar',
command=start_progressbar).grid(column=0, row=1, sticky=tk.W)
ttk.Button(buttons_frame, text='Stop immediately',
command=stop_progressbar).grid(column=0, row=2, sticky=tk.W)
ttk.Button(buttons_frame, text='Stop after second',
command=stop_after_second).grid(column=0, row=3, sticky=tk.W)

# Add a Progressbar to Tab 2
progress_bar = ttk.Progressbar(tab2, orient='horizontal',
length=286, mode='determinate')
progress_bar.grid(column=0, row=4, pady=2)

[...]

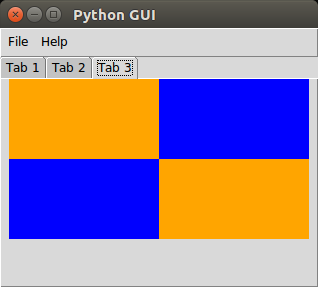
使用 canvas widget

1
2
3
4
5
6
7
8
9
10
11
12
13
14
15
16
17
18
19
20
21
22
[...]
tabControl = ttk.Notebook(window)

# Create a tab
tab1 = ttk.Frame(tabControl)
# Add a tab
tabControl.add(tab1, text='Tab 1')
tab2 = ttk.Frame(tabControl)
tabControl.add(tab2, text='Tab 2')
tab3 = ttk.Frame(tabControl)
tabControl.add(tab3, text='Tab 3')
[...]

# Tab 3 control
tab3_frame = tk.Frame(tab3, bg='blue')
tab3_frame.pack()
for orange_color in range(2):
canvas = tk.Canvas(tab3_frame, width=150, height=80,
highlightthickness=0, bg='orange')
canvas.grid(row=orange_color, column=orange_color)

[...]

Full Version Code

1
2
3
4
5
6
7
8
9
10
11
12
13
14
15
16
17
18
19
20
21
22
23
24
25
26
27
28
29
30
31
32
33
34
35
36
37
38
39
40
41
42
43
44
45
46
47
48
49
50
51
52
53
54
55
56
57
58
59
60
61
62
63
64
65
66
67
68
69
70
71
72
73
74
75
76
77
78
79
80
81
82
83
84
85
86
87
88
89
90
91
92
93
94
95
96
97
98
99
100
101
102
103
104
105
106
107
108
109
110
111
112
113
114
115
116
117
118
119
120
121
122
123
124
125
126
127
128
129
130
131
132
133
134
135
136
137
138
139
140
141
142
143
144
145
146
147
148
149
150
151
152
153
154
155
156
157
158
159
160
161
162
163
164
165
166
167
168
169
170
171
172
173
174
175
176
177
178
179
180
181
182
183
184
185
186
187
188
189
190
191
192
193
194
195
196
197
198
199
200
201
202
203
204
205
206
207
208
209
210
211
212
213
214
215
216
217
218
219
220
221
222
223
224
225
226
227
228
229
230
231
232
233
234
235
236
237
238
239
240
241
242
243
244
245
246
247
248
249
250
251
252
253
254
255
256
257
258
259
260
261
262
263
264
265
266
267
268
269
270
271
272
273
274
275
276
277
278
279
280
281
282
283
284
285
286
287
288
289
#!/usr/bin/env python3

import tkinter as tk
from tkinter import ttk
from tkinter import scrolledtext
from tkinter import Menu
from tkinter import messagebox as msg
from tkinter import Spinbox
from time import sleep


class ToolTip(object):
def __init__(self, widget):
self.widget = widget
self.tip_window = None


def show_tip(self, tip_text):
if self.tip_window or not tip_text:
return
# get size of widget
x, y, _cx, cy = self.widget.bbox('insert')
# calculate to display tooltip
x = x + self.widget.winfo_rootx() + 25
y = y + cy + self.widget.winfo_rooty() + 25
# create new tooltip window
self.tip_window = tw = tk.Toplevel(self.widget)
# remove all Window Manager (wm) decorations
tw.wm_overrideredirect(True)
tw.wm_geometry('+%d+%d' % (x, y))

label = tk.Label(tw, text=tip_text, justify=tk.LEFT,
background='#ffffe0', relief=tk.SOLID, bd=1)
label.pack(ipadx=1)


def hide_tip(self):
tw = self.tip_window
self.tip_window = None
if tw:
tw.destroy()


def create_ToolTip(widget, text):
tooltip = ToolTip(widget)
def enter(event):
tooltip.show_tip(text)
def leave(event):
tooltip.hide_tip()

widget.bind('<Enter>', enter)
widget.bind('<Leave>', leave)


# Create instance
window = tk.Tk()

# Add a title
window.title('Python GUI')

tabControl = ttk.Notebook(window)

# Create a tab
tab1 = ttk.Frame(tabControl)
# Add a tab
tabControl.add(tab1, text='Tab 1')
tab2 = ttk.Frame(tabControl)
tabControl.add(tab2, text='Tab 2')
tab3 = ttk.Frame(tabControl)
tabControl.add(tab3, text='Tab 3')

# Pack to make visible
tabControl.pack(expand=1, fill='both')


# Tab 1
# LabelFrame using tab 1 as the parent
mighty = ttk.LabelFrame(tab1, text=' Mighty Python ')
mighty.grid(column=0, row=0, padx=8, pady=4)

# Modify adding a Label using mighty as the parent instead of window
ttk.Label(mighty, text='Enter a name:').grid(column=0, row=0, sticky='W')

# Modify Button Click Function
def click_me():
action.configure(text='Hello ' + name.get() + ' ' + number_chosen.get())

# Adding a Textbox Entry widget
name = tk.StringVar()
name_entered = ttk.Entry(mighty, width=12, textvariable=name)
name_entered.grid(column=0, sticky='W') # align left/West

# Adding a Button
action = ttk.Button(mighty, text='Click Me!', command=click_me)
action.grid(column=2, row=1)

ttk.Label(mighty, text='Choose a number:').grid(column=1, row=0)
number = tk.StringVar()
number_chosen = ttk.Combobox(mighty, width=12, textvariable=number, state='readonly')
number_chosen['values'] = (1, 2, 4, 8, 16, 32, 64, 128, 256, 562, 1024)
number_chosen.grid(column=1, row=1)
number_chosen.current(10)


# Spinbox callback
def _spin():
value = spin.get()
print(value)
scr.insert(tk.INSERT, value+'\n')

# Adding a Spinbox widget
spin = Spinbox(mighty, from_=0, to=10, width=5, bd=8, command=_spin,
relief=tk.GROOVE)
spin.grid(column=0, row=2)

create_ToolTip(spin, 'This is a Spinbox widget')

Spinbox(mighty, values=(1, 2, 4, 8, 16, 32, 64),
width=5, bd=8, relief='flat').grid(column=1, row=2)

# Using a scrolled text control
scrol_w = 30
scrol_h = 3

scr = scrolledtext.ScrolledText(mighty, width=scrol_w, height=scrol_h, wrap=tk.WORD)
scr.grid(column=0, row=3, sticky='WE', columnspan=3)

# Add a Tooltip to the ScrolledText widget
create_ToolTip(scr, 'This is a ScrolledText widget')


# Tab 2
# We are creating a container frame to hold all other widgets
mighty2 = ttk.LabelFrame(tab2, text=' The Snake ')
mighty2.grid(column=0, row=0, padx=8, pady=4)

# Creating three checkbuttons
chVarDis = tk.IntVar()
check1 = tk.Checkbutton(mighty2, text='Disabled', variable=chVarDis, state='disabled')
check1.select()
check1.grid(column=0, row=1, sticky=tk.W)

chVarUn = tk.IntVar()
check2 = tk.Checkbutton(mighty2, text='UnChecked', variable=chVarUn)
check2.deselect()
check2.grid(column=1, row=1, sticky=tk.W)

chVarEn = tk.IntVar()
check3 = tk.Checkbutton(mighty2, text='Enabled', variable=chVarEn)
check3.deselect()
check3.grid(column=2, row=1, sticky=tk.W)

# GUI Callback function
def checkCallback(*ignoredArgs):
if chVarUn.get():
check3.configure(state='disabled')
else:
check3.configure(state='normal')
if chVarEn.get():
check2.configure(state='disabled')
else:
check2.configure(state='normal')

# trace the state of the two checkbutton
chVarUn.trace('w', lambda unused0, unused1, unused2 : checkCallback())
chVarEn.trace('w', lambda unused0, unused1, unused2 : checkCallback())

# First, we change our Radiobutton global variables into a list
colors = ['Blue', 'Gold', 'Red']

# We have also changed the callback function to be zero-based, using the list
# instead of module-level global variables
# Radiobutton callback
def radCall():
radSel = radVar.get()
if radSel == 0:
window.configure(background=colors[0])
elif radSel == 1:
window.configure(background=colors[1])
elif radSel == 2:
window.configure(background=colors[2])

# create three Radiobuttons using one variable
radVar = tk.IntVar()

# Now we are selecting a non-existing index value for radVar
radVar.set(99)

# Now we are creating all three Radiobutton widgets within one loop
for col in range(3):
currad = tk.Radiobutton(mighty2, text=colors[col], variable=radVar,
value=col, command=radVar)
currad.grid(column=col, row=2, sticky=tk.W)

# update progressbar in callback loop
def run_progressbar():
progress_bar['maximum'] = 100
for i in range(101):
sleep(0.05)
# increment progressbar
progress_bar['value'] = i
# have to call update() in loop
progress_bar.update()
# reset/clear progressbar
progress_bar['value'] = 0

def start_progressbar():
progress_bar.start()

def stop_progressbar():
progress_bar.stop()

def stop_after_second():
window.after(500, progress_bar.stop)

# Create a container to hold labels
buttons_frame = ttk.LabelFrame(mighty2, text=' ProgressBar ')
buttons_frame.grid(column=0, row=3)

# Place labels into the container element
ttk.Button(buttons_frame, text=' Run Progressbar ',
command=run_progressbar).grid(column=0, row=0, sticky=tk.W)
ttk.Button(buttons_frame, text='Start Progressbar',
command=start_progressbar).grid(column=0, row=1, sticky=tk.W)
ttk.Button(buttons_frame, text='Stop immediately',
command=stop_progressbar).grid(column=0, row=2, sticky=tk.W)
ttk.Button(buttons_frame, text='Stop after second',
command=stop_after_second).grid(column=0, row=3, sticky=tk.W)

# Add a Progressbar to Tab 2
progress_bar = ttk.Progressbar(tab2, orient='horizontal',
length=286, mode='determinate')
progress_bar.grid(column=0, row=4, pady=2)


# Tab 3 control
tab3_frame = tk.Frame(tab3, bg='blue')
tab3_frame.pack()
for orange_color in range(2):
canvas = tk.Canvas(tab3_frame, width=150, height=80,
highlightthickness=0, bg='orange')
canvas.grid(row=orange_color, column=orange_color)


# Exit GUI cleanly
def _quit():
window.quit()
window.destroy()
exit()

# Creating a Menu Bar
menu_bar = Menu(window)
window.configure(menu=menu_bar)

# Add menu items
file_menu = Menu(menu_bar, tearoff=0)
file_menu.add_command(label='New')
file_menu.add_separator()
file_menu.add_command(label='Exit', command=_quit)
menu_bar.add_cascade(label='File', menu=file_menu)

# Display a message box
def _msgBox():
# msg.showinfo('Python Message Info Box',
# 'A Python GUI created using tkinter:\n The year is 2017.')
# msg.showwarning('Python Message Warning Box',
# 'A Python GUI Cretaed using tkinter:'
# '\nWarning: There might be a bug in this code.')
# msg.showerror('Python Message Error Box',
# 'A Python GUI created using tkinter:'
# '\nError: Houston ~ We DO have a serious PROBLEM!')
answer = msg.askyesnocancel('Python Message Mutil Choice Box',
'Are you sure you really wish to do this?')
print(answer)

# Add another Menu to the Menu Bar and an item
help_menu = Menu(menu_bar, tearoff=0)
help_menu.add_command(label='About', command=_msgBox)
menu_bar.add_cascade(label='Help', menu=help_menu)

# Windows "ico" and Unix "xbm"
# window.iconbitmap('卷纸.ico')
img = tk.PhotoImage(file='卷纸.png')
window.tk.call('wm', 'iconphoto', window._w, img)

name_entered.focus()

window.mainloop()

参考文献

  • Python GUI Programming Cookbook - Second Edition by Burkhard A. Meier